Detailed Examples
The source code in the following code examples can be copied right from this page by looking for the clipboard image at the top right-hand corner of the source code box.
Basic Use
The following example is functional with all counters currently supported by
PyMotifCounter.To try out another counter, exchange
PyMotifCounterMfinderfor one ofPyMotifCounterNetMODE, PyMotifCounterFanmod, PyMotifCounterPgd
"""
Visualise the distribution of size-3 motifs.
"""

from pymotifcounter.concretecounters import PyMotifCounterMfinder
from matplotlib import pyplot as plt
from networkx import watts_strogatz_graph

if __name__ == "__main__":
    # Create an example network
    g = watts_strogatz_graph(100, 8, 0.2)
    # Create a motif counter based on mfinder
    motif_counter = PyMotifCounterMfinder()
    # Enumerate motifs using the selected counter
    g_mtf_count = motif_counter(g)
    # Visualise the distribution
    g_mtf_count.plot.bar("motif_id", "nreal")
    plt.tight_layout()
    plt.show()
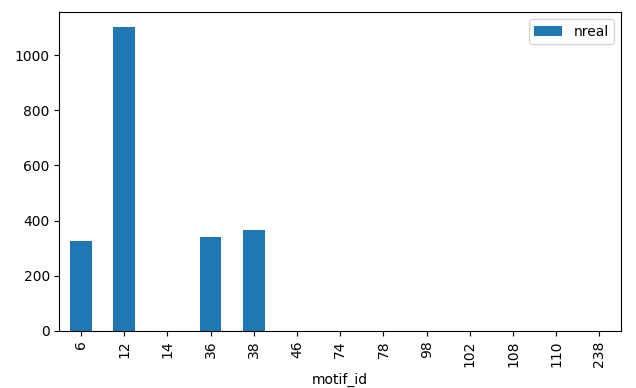
Distribution of fully connected motifs of size 3 for a given network.
Parameter values and aliases
To change a parameter value, address it by its name, just as it would appear in the command line.
Different authors are using different variable names to refer to the same entity. For example, motif size might be known as
sin one algorithm butkin another.PyMotifCounterhas Parameter Aliases so you can simply usemotif_sizeand it will be translated to whatever the underlying algorithm uses.Let’s visualise the motif distribution of size 4 and 5 motifs here:
"""
Visualise the distribution of size-k motifs, for k \in {4,5}.
"""

from pymotifcounter.concretecounters import PyMotifCounterMfinder
from matplotlib import pyplot as plt
from networkx import watts_strogatz_graph

if __name__ == "__main__":
    # Create an example network
    g = watts_strogatz_graph(100, 8, 0.2)
    # Create a motif counter based on mfinder
    motif_counter = PyMotifCounterMfinder()
    # The default value of parameter motif-size is 3.
    # Let's change it to 4
    motif_counter.get_parameter("s").value = 4
    # Produce the enumeration
    g_mtf_4_count = motif_counter(g)

    # mfinder calls the motif_size (s) but NetMODE calls it
    # (k). If you change enumerator to NetMODE, this code will
    # raise an exception.
    #
    # BUT!!!
    #
    # Semantically common variables for all algorithms can be addressed
    # with common names.
    # Notice here how motif size is changed to 5.
    #
    motif_counter.get_parameter("motif_size").value = 5
    # Produce the enumeration
    g_mtf_5_count = motif_counter(g)

    # Visualise distributions
    sb_ax = plt.subplot(211)
    plt.title("Motif size 4 distribution.")
    g_mtf_4_count.plot.bar("motif_id", "nreal", ax=sb_ax)

    sb_ax = plt.subplot(212)
    plt.title("Motif size 5 distribution.")
    g_mtf_5_count.plot.bar("motif_id", "nreal", ax=sb_ax)
    plt.tight_layout()

    plt.show()

Motif distributions for motifs of size 4 and size 5.
Inspecting the available parameters
To get a quick human-readable overview of the parameters of a given counter, use the
show_parameters()function.Suppose that you work on the command line or within a Jupyter notebook and notice that a new motif counter is now accessible via
PyMotifCounter.To get a human readable overview of the supported parameters, you can:
# First of all, let's import a counter
from pymotifcounter.concretecounters import PyMotifCounterMfinder

# Let's construct a counter instance (the instance is constructed with
# sensible default values for all of its parameters)
motif_counter = PyMotifCounterMfinder()

# Now, let's get a human readable form of all of its parameters:
hrf = motif_counter.show_parameters()

# Printing out the elements of the ``hrf`` list will result
# in a nicely printed human readable form of the parameters
for an_hrf in hrf:
    print(an_hrf)
This would return:
nd/is_undirected
    Help String       :Input network is a non-directed network
    Required          :Optional
    Default value     :False
    Current value     :False
    Validation state  :Valid
    Is flag           :Yes
r/n_random
    Help String       :Number of random networks to generate
    Required          :Mandatory
    Default value     :0
    Current value     :0
    Validation state  :Valid

s/motif_size
    Help String       :Motif size to search
    Required          :Mandatory
    Default value     :3
    Current value     :3
    Validation state  :Valid
You can also get the human readable form of any parameter via the get_parameter() function too, like this:
# Continuing from the previous session
print(motif_counter.get_parameter("s"))
Visualising motifs
Motif IDs translate to the adjacency matrix of the subgraph they describe.
PyMotifCountercontains a function that can return that adjacency matrix for any further use.One of those uses might be to actually visualise the motif subgraph. Let’s do that here:
"""
Visualise a motif's graph, given its ID.
"""

from pymotifcounter.util import motif_id_to_adj_mat
from matplotlib import pyplot as plt
import networkx

if __name__ == "__main__":
    # Get the adjacency matrix of a motif given its ID and the size
    # of its "motif class".
    #
    # Here, we are trying to visualise motif 98 from the class of
    # fully connected motifs of size 3.
    motif_6_a = motif_id_to_adj_mat(98, 3)

    # From here onwards, use standard networkx functions
    # to visualise the motif subgraph
    motif_g = networkx.from_numpy_array(motif_6_a,
                                        create_using=networkx.DiGraph)

    networkx.draw_spectral(motif_g)
    plt.tight_layout()
    plt.show()

Motif 98, from the class of fully connected motifs of size 3 is a directed 3-cycle.
For more motif subgraphs, see this motif dictionary [1]
Creating input files
If you have a large number of networks available, you can still use
PyMotifCountercomponents to prepare them for motif analysis by one of the supported algorithms.Suppose for instance that you have a number of networks that were generated by some algorithm or were instantiated into
neworkxobjects via one of the formats that networkx supports.To prepare a directory of input files for data processing (e.g. with
mfinder), you could:
"""
Creates data for a small population of networks
from two structural classes: Small-World and Random networks.
"""

from pymotifcounter.concretecounters import (PyMotifCounterInputTransformerMfinder,
                                             PyMotifCounterInputTransformerFanmod,
                                             PyMotifCounterInputTransformerNetMODE)
import networkx

N_NETWORKS = 3  # Number of networks in each class
N_NODES = 100   # Number of nodes in each network
K_AVERAGE = 8   # Average node degree

# The active transformer determines the format.
# This example saves the networks in the format expected by mfinder
# Assign the ACTIVE_TRANSFORMER to one of the other imported
# transformers to change the format.
ACTIVE_TRANSFORMER = PyMotifCounterInputTransformerMfinder

if __name__ == "__main__":
    # Prepare N_NETWORKS small-world networks
    networks = [networkx.watts_strogatz_graph(N_NODES,
                                              K_AVERAGE,
                                              0.08)
                for k in range(0, N_NETWORKS)]

    # Prepare N_NETWORKS random networks
    networks += [networkx.watts_strogatz_graph(N_NODES,
                                               K_AVERAGE,
                                               0.9)
                 for k in range(0, N_NETWORKS)]


    # Write everything to THE CURRENT WORKING DIRECTORY in
    # the format expected by mfinder
    for a_net_id, a_network in enumerate(networks):
        ACTIVE_TRANSFORMER().to_file(a_network,
                                     f"net_data_{a_net_id}")
Parsing existing motif counts
If you have a directory full of output files from one of the supported algorithms, you can still get the enumerations as
pandasdata frames.In this example, it is assumed that
mfinderhas been executed over the files produced by this example. You can do this manually, or by using a very simple bash script like:#!/bin/bash # A very simple bash script to apply mfinder over a # population of network files in a directory for a_file in `ls net_data_*`; do mfinder $a_file -s 3 -r 0 -f ${a_file}_motif_count doneNotice here: input files are prefixed by
net_data_and output files end in_motif_count.To parse the results for further analysis using
PyMotifCountercomponents:
"""
Reads motif counts for a small population of motif count results.
"""
from pymotifcounter.concretecounters import (PyMotifCounterOutputTransformerMfinder,
                                             PyMotifCounterOutputTransformerFanmod,
                                             PyMotifCounterOutputTransformerNetMODE)
import glob

# The active transformer determines the format.
# This example reads networks in the format expected by mfinder.
# Assign the ACTIVE_TRANSFORMER to one of the other imported
# transformers to change the format.
ACTIVE_TRANSFORMER = PyMotifCounterOutputTransformerMfinder

if __name__ == "__main__":
    # Obtain a sorted list of result files from the disk
    network_files = sorted(glob.glob("net_data_*_motif_count"),
                           key=lambda x: int(x.replace("net_data_", "").replace("_motif_count", "")))

    # Convert their counts to data frames.
    result_dataframes = []
    for a_net_id, a_network in enumerate(network_files):
        result_dataframes.append(ACTIVE_TRANSFORMER().from_file(a_network))
Using a locally available binary
If you already have one of the supported binaries installed on your system, you can pass its absolute location to
the constructor using the parameter binary_location:
motif_counter = PyMotifCounterMfinder(binary_location="/some/path/to/mfinder")